内容纲要
准备工作
购买一个自身带多个IP的vps
够买一个域名并绑定一个vps中的一个IP
视频教程
视频中的脚本购买下载链接:
https://www.hostwinds.com/33805.html
可以在他家购买,可以添加多个IP(注册时候信息填写大陆,会有支付宝支付方式)
配置机器软件环境
依次执行下面的命令,关键命令有注释 # 后面的是注释
apt update -y
apt install iptables -y
apt-get purge netfilter-persistent
iptables -P INPUT ACCEPT

iptables -P FORWARD ACCEPT

iptables -P OUTPUT ACCEPT

iptables -F
# 安装软件
apt install -y curl && apt install -y socat

curl https://get.acme.sh | sh
~/.acme.sh/acme.sh --set-default-ca --server letsencrypt
# 下面的邮箱地址可以随便填写
~/.acme.sh/acme.sh --register-account -m 28417@qq.com
# -d 后面填写域名,这个域名要和当前vps做过绑定
~/.acme.sh/acme.sh --issue -d 域名 --standalone --force
# -d 后面填写域名,这个域名要和当前vps做过绑定
~/.acme.sh/acme.sh --installcert -d 域名 --key-file /root/private.key --fullchain-file /root/cert.crt
# 安装x-ui
bash <(curl -Ls https://raw.githubusercontent.com/vaxilu/x-ui/master/install.sh)
# 优化网速
wget -N --no-check-certificate "https://raw.githubusercontent.com/chiakge/Linux-NetSpeed/master/tcp.sh" && chmod +x tcp.sh && ./tcp.sh
# 其他的软件
apt install tmux -y
apt install ufw -y
apt install vim -y
apt install sqlite
timedatectl set-timezone Asia/Shanghai
# 关闭防火墙
ufw disable
随后配置x-ui面板下的节点
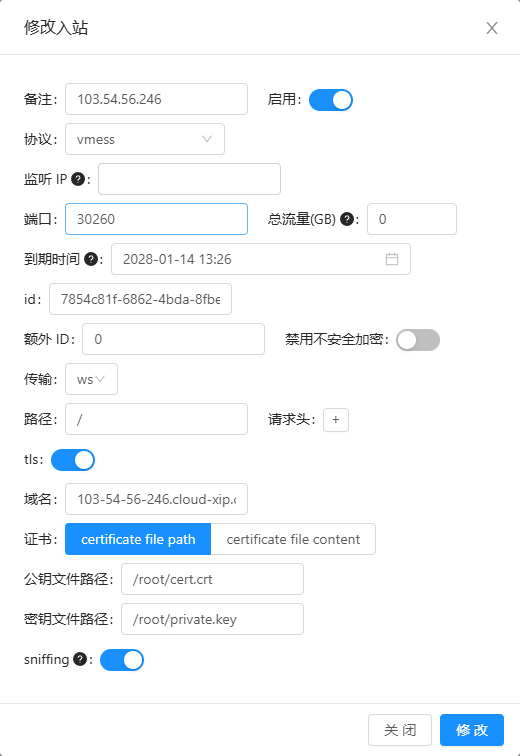
配置路由规则样例
{
  "api": {
    "services": [
      "HandlerService",
      "LoggerService",
      "StatsService"
    ],
    "tag": "api"
  },
  "inbounds": [
    {
      "listen": "127.0.0.1",
      "port": 62789,
      "protocol": "dokodemo-door",
      "settings": {
        "address": "127.0.0.1"
      },
      "tag": "api"
    }
  ],
  "outbounds": [
    {
      "tag": "ip1",
      "sendThrough": "103.54.56.246",
      "protocol": "freedom",
      "settings": {}
    },
    {
      "tag": "ip2",
      "sendThrough": "199.19.73.207",
      "protocol": "freedom",
      "settings": {}
    }
  ],
  "policy": {
    "system": {
      "statsInboundDownlink": true,
      "statsInboundUplink": true
    }
  },
  "routing": {
    "rules": [
      {
        "inboundTag": [
          "inbound-30260",
          "inbound-30260"
        ],
        "outboundTag": "ip1",
        "type": "field"
      },
      {
        "inboundTag": [
          "inbound-30261",
          "inbound-30261"
        ],
        "outboundTag": "ip2",
        "type": "field"
      }
    ]
  },
  "stats": {}
}